If you have an [email protected] email account created by SourceLink, you have full control over how e-mail forwards are setup and redirections to your catch-all email account are managed.
To Add an Email Forward
- Log in to Gmail by Google, https://www.gmail.com
- Username: [email protected]
- Password: Provided by SourceLink (please DO NOT turn on 2FA or change the recovery email from [email protected], so we may support you!)
- Click the Gear icon from the top right
- Select ‘See All Options’
- Click on Forwarding and IMAP/POP tab from across the top menu
- Click ‘Add a Forwarding Address’
- Enter the new email address for the info@ to forward to (e.g. [email protected])
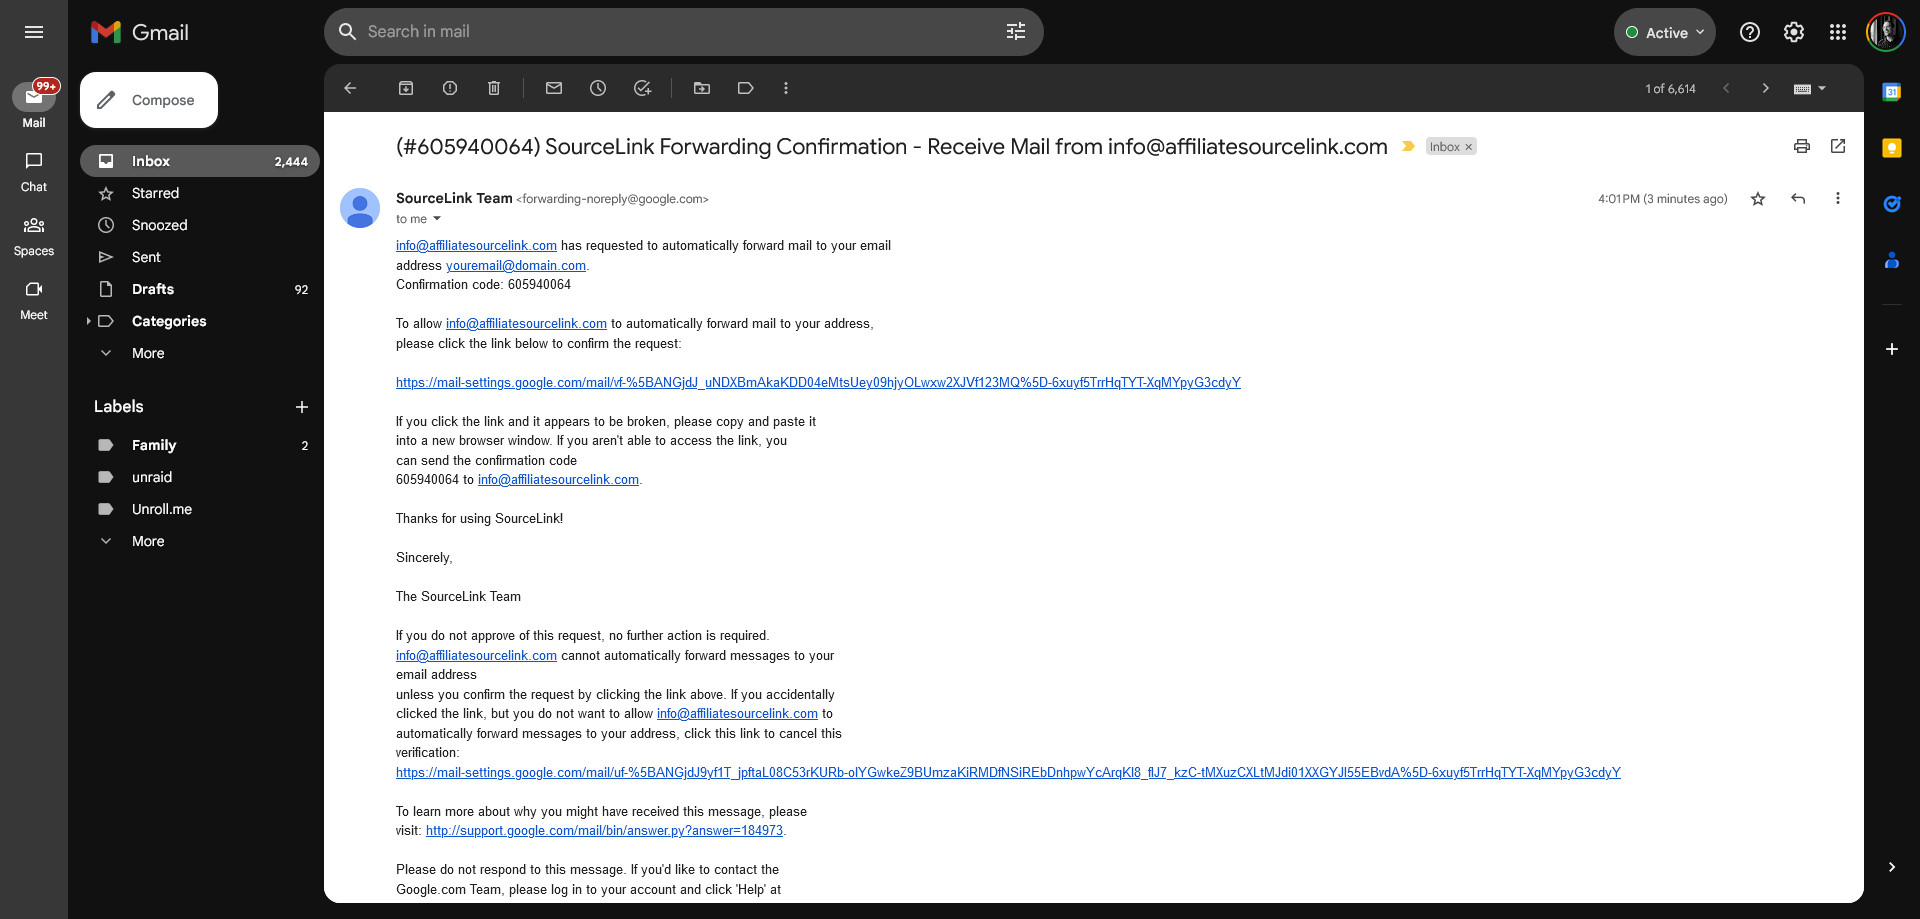
- The recipient e-mail account will receive an e-mail from Google/Gmail asking to approve, the recipient may click on the included link in the e-mail to allow the forward action to happen, or give you a code to use next to their name:
- Once the forward is allowed by Step 7, you will need to create a new Filter to make the emails travel to the desired recipient; to accomplish this, click on the ‘Filters and Blocked Addresses’ tab using the same process outlined in Steps 1, 2, and 3
- Select the text link option to “Create a New Filter”
- Set the TO: line to be your catch all e-mail (e.g. [email protected])
- Click on ‘Create Filter’ NOT the big blue Search button
- Check the box that says, “Forward it to” and pick the desired email from the drop down menu (Note: approval via Step 7 is required before the desired recipient email will show here)
- Select the Create Filter button to complete the email forward process
To Remove an Email Forward
- Use Steps 1, 2, 3 above
- Check the recipient you wish to remove from the table displayed on this page
- Select the Delete button to stop the forward to going to the old reciepient
Protips
- Because catch-all emails are out on the website for all to see, you will receive all kinds of messages from spammers and bots. Most times these are caught in the Gmail spam inbox and not forwarded to intended recipients who are set to receive forwards. Always login direct to Gmail using Steps 1, and 2 to validate this. If you need, you can set a filter to forward specific messages to always be allowed to go through.
- Beware of any domain renewal or copyright emails that appear scary. They are spam. If you receive a notice, make sure it is coming from an attorney and not via e-email. Our SourceLink team only builds website content from our template and revised copy/images that affiliates provide and ensure us they have the rights too, and we typically hold and manage all domains for affiliates, leaving you to be worry free on this front. See more information about ‘Domain Renewal’ and ‘Copyright Infringement’ claims.
- SourceLink uses enterprise grade monitoring systems to ensure our e-mail delivery is not flagged by ISPs as spam. Issues where this comes up are extremely rare. We have found that where there are issues, individual corporate domain networks have blocked e-mails and need to be whitelisted. Check with your internal IT or IS department for whitelisting emails from your SourceLink domain as the first step.
- Using the steps identified above, info@ emails may be directed to more than one person. It’s best practice to reply to info@ emails from your personal e-mail with the info@ email on the BCC line, to indicate to other internal staff that receive these messages that you have responded.
- You may also decide, instead to forward e-mails, to share and load this Google mailbox to your favorite email client (Outlook being the most popular). Going this route will allow everyone who has access the ability to see inbox, sent, and any custom folders setup in Gmail. The downside to going this route is that it is more complicated. You can review the instructions for doing this via the related help document included to the right titled, “Adding a SourceLink Email Account in Outlook”.